How To Use Your Own Calligraphy As A Source For Your Smartphone

calligraphy
Now, you can have your own letter in all menus, application names, and WhatsApp conversations. All the text you read on your smartphone will have all your essence, and it is the height of personalization. Find a printer and a black marker that we started.

Changing the letters of the operating system is not something that is done every day, and you need to have a few privileges for it. The system typeface is stored within the system files, and in order to modify these files, we must be the root of our device.

We also need to have Xposed Framework installed because thanks to one of its modules, we will be able to manage the fonts on our smartphone easily.

Digitize your calligraphy

The first step to being able to use our letter as a source in the system will be to digitize our writing. For this, we will use an online tool called My Script Font. Go to their website and download the templates to digitize your calligraphy, they are available in PDF or PNG.

Fill in the template carefully but try not to follow the sample letter that each box has, take out all your style. It is better to use a black marker with a fine tip. If you want a great finish, first use a pencil and then review it with the marker. Very important: do not leave the square or the letters will be cut.

Do not get out of the square.

Once you have all your well-profiled letters, scan the document at a good resolution, between 300 and 600 dpi. You can scan it with your smartphone if you don't have another method at hand. With the scan file, return to the web where you downloaded them, and in the second step, you can upload the file. You can also change the name that your typography will have in 'Name your font.' We will leave the format in TTF and click on 'Start.'

When you finish below the sample text, you will have a link to download the file <Name of Your Calligraphy> .ttf.

Change the typography of your smartphone

To change the system font, we need to install Xposed and the iFont (Expert of Fonts) module installed and activated in the Xposed Installer app. Before placing our own calligraphy, make a copy of the original system typography inside iFont in My> Factory Font> Backup font.
Search your writing
Search your writing.


Search your writing.

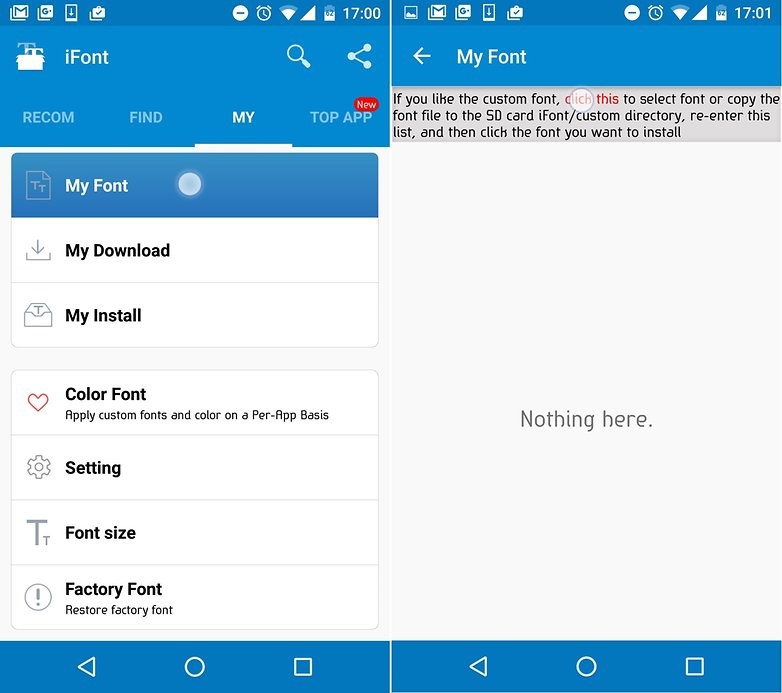
Save the TTF file with your calligraphy on your device. In the iFont application and go to My> My Font. Now in the text that appears above click on the red letters 'click this'. Search now where the .ttf file is with your letter, select it and when it loads click on 'SET.'

The device will restart and you already have the typography of your smartphone in your own handwriting, literally. You can also use other typography in TTF format does not have to be yours.

Restart and go
Restart and go

Your letter even in the WhatsApp

Have you always wanted to have your own letter on your smartphone?

Comments

Popular posts from this blog

How to sync and organize your contacts on Android Smartphone

The contacts are a fundamental part of our smartphones. Do not forget that these devices were originally invented to make calls. To be clear about how to manage and synchronize our contacts, we bring you this small guide for good practices. How to manage your contacts easily The Contacts application (it has changed its name many times, but in the Oreo and Pie versions of Android it is called that) allows you to access the contacts associated with your Google account immediately. You will find a search button in the upper right and a large red button to add the contact in the lower right. Your favorites, that is, the list of contacts that have earned a star (either on Android or the web), as well as the list of contacts with whom you communicate most, are shown at the top. If you usually talk to the same number of people, this is probably the best way to use the Contacts application. Choose any contact to display its associated file. You can call him, send him an email or SMS ...

How to choose the default user account to log in to Windows 10

The Microsoft operating system allows you to create a user account so that each person using the same computer has their own account. These accounts can be of different types depending on the permissions that we want them to have, being able to be an administrator account or a standard account. Anyway, when starting the computer, we will see that by default one of the accounts selected to log in to the system appears, although from the Windows 10 login screen it is possible to choose, manually, the account with the one we want to log in to the system. Next, we will show how to select the user account that we want to be selected by default when you log in to Windows 10. On the login page, we see how in the lower left part a list appears with each and every one of the users accounts available in our system. To log in with one or the other, simply select the account from that list and then enter the PIN, pattern or fingerprint password and you're done. But if you are the one ...

How to make Windows 10 boot faster

Design by @abdugeek | TechEngage Every Windows user wants their computer to boot quickly. Windows OS tends to slow down the booting process if more apps or desktop are installed into the system. Each time you boot your computer, the startup process slows down. To overcome this issue, Windows 10 offers a startup application manager that applies to any Windows user. It also shows which programs are slowing down during the startup process. In this guide, we will take you through the steps of making Windows 10 boot faster. Here are two methods that you can follow to speed up Windows 10 at startup: Using the Startup Manager Startup manager is found in the Task Manager of Windows. You can change startup apps that are affecting Windows 10’s boot speed. To open ‘Task Manager,’ right-click the taskbar and select Task Manager. You can also press Ctrl + Shift + Escape keys at once to open ‘Task Manager’ directly, or Ctrl+ Alt + Delete and click ‘Task Manager.’ If Task Manager opens w...